As the holidays approach, our hearts often turn to those we’ve loved and lost. What if you could capture those precious memories and make them a part of your Christmas celebrations? Today, I’m excited to share a special sewing project that does just that. We’ll be creating beautiful memory Christmas ornaments using cherished pieces of clothing from loved ones who are no longer with us. This tutorial will guide you through transforming a simple piece of fabric into a heartfelt decoration that honors your memories. This project is a wonderful way to keep your loved ones close during the festive season. So, join me in crafting these meaningful keepsakes that will be treasured for years to come.

But before I begin this tutorial, let’s take a moment to understand why these memory ornaments hold such significance for so many people.
People make memory bears and Christmas ornaments because it helps them feel close to those they’ve lost. It’s a way to keep a piece of that person with them, especially during special times like the holidays.
These keepsakes are comforting. When you hold a bear made from grandpa’s old sweater or hang an ornament cut from mom’s favorite dress, it can bring back happy memories. You might remember the sound of their laugh, or the stories they used to tell, or even how they smelled.
It’s also a nice way to reuse clothes that might otherwise sit in a closet or be given away. Instead, they become something new and special that the whole family can appreciate.
For many, the act of making these items helps with grief. It gives them a project to focus on and a way to honor their loved one’s memory. Plus, these bears and ornaments often become talking points, letting families share stories and keep the person’s memory alive.
In short, these handmade items are more than just decorations. They’re a way to remember, to heal, and to keep loved ones close, even when they’re gone.
But you know what? You do not need to make them from the clothes of someone departed. You could, for example, make the ornaments from a piece of clothing worn at a special occasion by your child, this way that occasion will surely be remembered for as long as you have the ornament. Or, because they are indeed beautiful (and easy to make), you could simply make them just from regular fabric!
What you will need
Clothing item from loved one (blouse used in this tutorial)
Glittery felt for backing
Sewing machine
Metallic thread (gold used in this tutorial)
Regular thread matching felt color
Fabric scissors
Pinking shears
Pins
Fabric pen or chalk
Ornament template (available in my shop)
Polyester fiberfill or cotton batting
Ribbon for hanging (sparkly red and gold used here)
Decorative ribbons for embellishment
Fabric glue
Seam ripper
Step 1. Select the Clothing Item
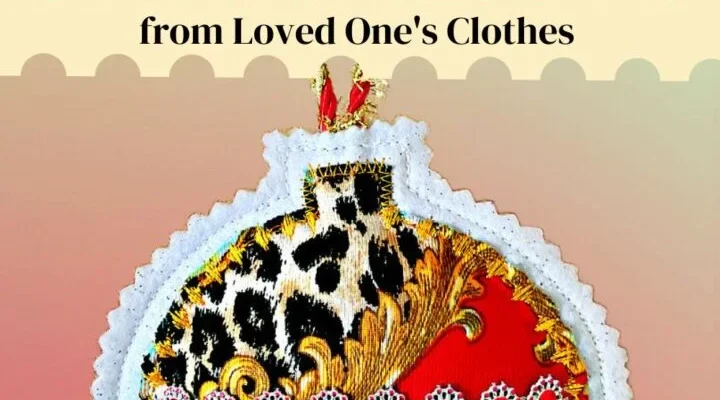
For this project, I chose my mother-in-law’s blouse. After she passed away, I kept this blouse because of its beautiful fabric – a lovely mix of red, gold, black, and white. The design is really special, with swirls of gold on red, giving it a kind of royal look.

I had originally planned to alter the blouse to fit me, as it’s a bit too big. But life got busy, and I never found the time to do it. Now, I’m glad I held onto it. While I couldn’t wear the blouse as is, it’s perfect for making these memory ornaments.
What’s great about this project is that it doesn’t take long to make an ornament. So even if you’ve been holding onto a loved one’s clothing item for a while, unsure what to do with it, this is a wonderful way to give it new life.
Whether the fabric is festive or not doesn’t matter – we can make it festive through our crafting. The important thing is the connection it holds to your loved one.
Step 2. Choose and Prepare Your Ornament Shape
For this tutorial, I’ve selected a globe shape. It’s a classic design that works well with most fabric patterns and is easy to customize.

Note: Some of the links on this page are affiliate links. This means I will receive a commission if you order a product through one of my links. I only recommend products I believe in and use myself.
To get started, you’ll need a template for your chosen shape. I’ve created a variety of ornament templates for you to choose from, which you can find in my shop (free of charge for my subscribers) here: Templates for Christmas Ornaments Made from Clothes. These templates come in two formats:
- PDF files for printing: If you prefer to work with paper patterns, you can print these out and use them to trace your shape onto the fabric.
- SVG files for cutting machines: If you have a Cricut or similar cutting machine, you can use these files to precisely cut your fabric shapes. If you do not have a Cricut yet but want to get one, I recommend the Maker version. It is more expensive but it cuts larger shapes and is, in general, a more versatile tool. Check Amazon prices here.
If you do not have a printer in home, print shops will print the files for pennies; but I find that having a printer is useful for many purposes. I recommend a laser printer, they have come down in prices and unlike the (cheaper) inkjet printers, you don’t need to worry about ink drying and clogging the nozzles. Check current offers at Amazon.
While I’ve chosen a round shape for this demonstration, feel free to experiment with different designs. Stars, trees, bells, angels and other shapes can work beautifully, depending on your fabric and personal preference. The most important thing is to choose a shape that speaks to you and honors the memory of your loved one.

Step 3. Cut Your Ornament Shape
Now it’s time to transform the fabric into your ornament shape. Look closely at your clothes and choose a section that showcases the most interesting colors or patterns. For my round ornament, I picked an area where the gold swirls on red background are particularly striking.
Place your template on the chosen spot and trace around it lightly with a fabric pen or chalk. If you’re using a cutting machine, follow the manufacturer’s instructions for cutting fabric.
Take your time as you cut. The fabric might be delicate, especially if the garment is old. Cut slowly and precisely along your traced line or let your cutting machine do its work.

As you cut, you might find yourself recalling memories associated with this blouse. That’s part of what makes this project so special. You’re not just crafting an ornament; you’re preserving a piece of your family history.
I am using these scissors, I find them excellent and they already lasted for a number of years. They are cheaper than other brand names but not of lower quality.
I am using an air and water erasable Dritz pen for marking, I find it better quality than other brands. There are cheaper alternatives and multi-packs available, however I find the multi packs less useful because by the time I get to use them, they are already dry. And other brands have a much lower user satisfaction rating.
Step 4. Prepare the Backing
For this step, we’ll use glittery felt to add some festive sparkle to our ornament. The glitter will catch the light on your Christmas tree, making the ornament even more eye-catching.

However, glitter can be messy and potentially irritating. Be careful when handling glittery felt. The glitter can easily transfer to your hands and may accidentally get in your eyes if you rub them. It’s a good idea to wash your hands thoroughly after handling the material.
Some glitter fabrics promise low shedding (or no shedding) but this has to be taken with a grain of salt in my opinion. If you’re sensitive to glitter or prefer not to work with it, regular felt is absolutely fine. The most important part of this project is the memory fabric, not the backing material.
Choose a color of felt that complements the fabric from your loved one’s clothing. For my ornament made from the red and gold blouse, I selected a white felt to enhance the existing colors.
Cut a piece of the felt slightly larger than your fabric shape. This extra allowance will make it easier to work with and ensure full coverage.
The felt backing serves two main purposes:
- It gives structure to your ornament.
- It provides a neat finish to the back.
So, while glitter can add sparkle, the true shine of these ornaments comes from the memories they hold.
Step 5. Attach Fabric to Felt Backing
Now it’s time to join your memory fabric to the felt backing. This step requires precision, but don’t worry – take it slow and you’ll do great.
First, pin your cut fabric shape to the felt backing. Pins help keep everything in place.
Thread your sewing machine with the thread you’ll use for both attaching and decorating. I chose gold metallic thread to complement the fabric’s pattern and add extra sparkle. Metallic thread can be tricky to work with, so if you need tips, check out my detailed tutorial Mastering the Art of Sewing with Metallic Thread
Set your machine to a straight stitch and carefully sew around the edge of the fabric shape, about 1 mm (less than 1/16″) from the edge. This close stitching ensures the fabric is securely attached to the felt while keeping the stitches nearly invisible from the front.
Take your time, especially around curves. You may need to stop with the needle down and adjust the fabric occasionally to maintain that 1 mm (less than 1/16″) distance from the edge.

Remember, this stitching is just to attach the fabric to the felt. We’ll add decorative stitches in the next step, so don’t worry if this line isn’t perfect. The most important thing is that your memory fabric is securely fastened to the backing.
But for this memory ornament, I wanted to create slightly padded, 3D effect, so it’s not completely flat. So leave a small opening (about 1.5 inches, 3.5-4cm) unsewn. This opening is for adding filling.

Carefully insert a small amount of polyester fiberfill (or cotton stuffing / batting) through the opening. Don’t overstuff – just enough to give the ornament a gentle plumpness.

Once you’re happy with the filling, pin the opening closed and sew it shut, maintaining that 1 mm (1/16″ or less) distance from the edge.
This method gives your ornament a soft, dimensional quality that adds to its charm.

Step 6. Add Decorative Stitching
Now it’s time to give your ornament some extra flair with decorative stitching.
Choose decorative stitches that have a dense pattern. These stitches should have many threads close together, making them stand out on the fabric. Your sewing machine likely has several options – look for stitches like scallops, waves, or intricate patterns. Choose stitches that complement rather than overpower the pattern of your loved one’s clothing.

Continue using the metallic thread for this step. The sheen of the metallic thread combined with dense decorative stitches will create a beautiful, sparkling effect that catches the light.
Sew around the shape of your ornament. Take your time, especially around curves. You might need to adjust your fabric as you go to keep the stitching even.
✅ Related tutorial: Decorative Sewing Machine Stitches
Step 7. Add Decorative Ribbons
What’s a Christmas ornament without some sparkle? Let your creativity shine and create a design that feels special to you. After all, this ornament is all about preserving memories in a beautiful, personal way.

Here’s how to add these final embellishments:
- Choose your ribbon. I’m using the one shown in the image, which complements the ornament beautifully. If you are looking for a decorative ribbon, here is a selection from Amazon.
- Cut small lengths of ribbon.
- Apply a thin line of fabric glue to the back of the ribbon piece.
- Carefully place the ribbon on your ornament.
- Hold the ribbon in place for a few seconds to allow the glue to set.
- Repeat with additional ribbon pieces as desired. Less is often more, so step back occasionally to check your overall design.
- Allow the glue to dry completely before handling the ornament.
Step 8. Finish the Back of the Ornament
Cut another piece of felt. This piece should be the same size as the front felt backing.
Place this new felt piece against the back of your ornament, wrong sides together. This means the glittery or finished side of both felt pieces should be facing outward.
Pin the layers together to keep everything in place while you sew.

Using a thread that matches your felt color, stitch around the entire ornament. Sew about 3mm (1/8″) from the edge, enclosing all layers. This creates a neat finish and secures everything together.
Take your time, especially around curves. Remove pins as you go to avoid sewing over them.

Step 9. Trim the Edges
Now it’s time to trim away the excess felt.
For this step, we’ll use pinking shears. These special scissors create a zigzag edge that looks decorative.
Carefully trim around the entire ornament, staying about 3-4mm (1/8″) outside your stitching line.
As you trim, you’ll see your ornament take on a more polished appearance. The pinked edge complements the overall design.
If you don’t already have pinking shears, you can find good quality ones on Amazon. I recommend this pair, which I’ve found works well for projects like this.

Step 10. Create an Opening for the Hanging Ribbon
We have finished the ornament! But we need to hang it on the tree, and for this we will use also an ornamental cord (or ribbon). I used something I already had, but I found a very similar one on Amazon.
This next step might seem a bit unconventional, but it works well for me.
Now that you’ve trimmed the edges with pinking shears, we’ll create an opening for the hanging ribbon. Here’s how:
- Locate the top center of your ornament.
- Carefully use a seam ripper to remove some of stitching at this spot (about 3/4 inch, or 2cm). Go slowly to avoid damaging the fabric or felt.
- Once you’ve created a small opening, take your ribbon (I’m using a sparkling one with golden threads to match the ornament) and insert both ends through the opening.
- Push about 2 inches (5cm) of ribbon through to the inside of the ornament making sure it’s centered and straight.
- Sew the opening shut, securing the ribbon in place. Sew back and forth a few times for extra strength.

This method allows you to add the ribbon after trimming, preventing any accidental cuts to your hanging loop. It might feel strange to undo some of your work, but the end result is a securely attached ribbon that looks great.
Liked this tutorial? Don’t forget to save this pin to your sewing Pinterest board for future reference. This way, you can easily return to this guide whenever you’re ready to sew memory Christmas ornaments. For more creative sewing tips, tutorials, and daily doses of inspiration, make sure to follow me on Pinterest.


